


About
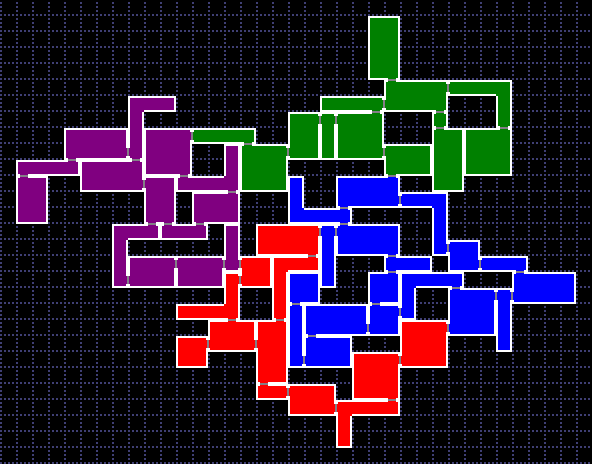
This package allows for the creation of procedurally generated metroidvania style layouts from user-defined level layout graphs and room templates. The resulting layouts can be used in games and to render maps, such as that shown below.
Features
- Single and multi-layer 2D room layout generation.
- Graph-based procedural generation.
- Specification of room connection constraints by defining door directions and matching door codes.
- Rendering of generated layouts to image files using built-in or custom map tiles.
- Procedural distribution of collectables throughout layout.
- Supports gradual map discovery through cell filters.
- Persistence of layout and layout state data through JSON and XML via Data Contract serialization.
Game Engine Support
Layout Generator Example
The following subsections outline how to use the LayoutGenerator class to generate a room layout.
Step 1: Create Room Templates
The generator creates rooms by pulling from user-defined room templates. Room templates consist of a 2D array of cells, that may be empty (a null value) or filled. Each cell includes the possible door connections (north, south, east, west, top, and/or bottom) that can be made from that cell to other rooms.
The following code provides an example for the creation of a simple 3x3 square room template. In it, a series of cells are created and have doors set to them via directional characters ("N" = North, "S" = South, etc.). The cells are then assigned to a 2D array to create the geometry of the layout. Finally, these cells are passed to the RoomTemplate initializer, along with a unique ID, to create the room template.
{RoomTemplate.cs}
var o = Cell.New;
var a = Cell.New.SetDoors("WN", Door.TwoWay);
var b = Cell.New.SetDoors("N", Door.TwoWay);
var c = Cell.New.SetDoors("NE", Door.TwoWay);
var d = Cell.New.SetDoors("W", Door.TwoWay);
var e = Cell.New.SetDoors("E", Door.TwoWay);
var f = Cell.New.SetDoors("WS", Door.TwoWay);
var g = Cell.New.SetDoors("S", Door.TwoWay);
var h = Cell.New.SetDoors("SE", Door.TwoWay);
var cells = new Cell[,]
{
{ a, b, c },
{ d, o, e },
{ f, g, h },
};
var roomTemplate = new RoomTemplate(id: 1, name: "Square", cells: cells);
Step 2: Assign Room Templates to Template Groups
Once some room templates have been defined, they must be added to one or more room template groups, which can be referenced by name later. This is accomplished by simply adding them to a TemplateGroups object:
{TemplateGroups.cs}
var templateGroups = new TemplateGroups();
templateGroups.Add("Default", roomTemplate);
Step 3: Create a Layout Graph
To provide a designed feel to generated layouts, the generator uses a room layout graph as the basis for generating layouts. The layout graph consists of nodes, representing rooms, and edges, representing door connections between rooms.
Each graph element can be assigned one or more room template groups (created in Step 2) from which room templates can be drawn for that location. Z (layer) values can also be assigned to elements to create a multi-level room layout.
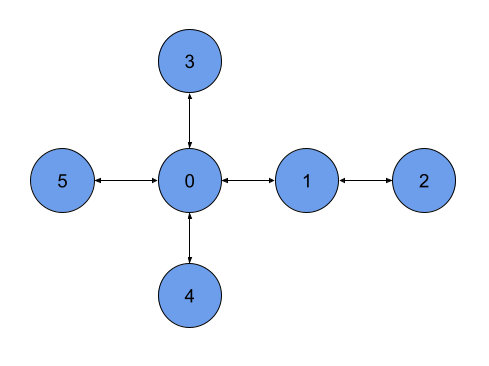
In the below example, the graph shown in the image is created by adding edges to a graph. In the process, the connected nodes are automatically created. Afterwards, the code loops over all created nodes and assigns the "Default" template group name to them.
{LayoutGraph.cs}
var graph = new LayoutGraph(id: 1, name: "ExampleGraph");
// Define edges between nodes. Nodes not already in graph will automatically be created.
graph.AddEdge(0, 1);
graph.AddEdge(1, 2);
graph.AddEdge(0, 3);
graph.AddEdge(0, 4);
graph.AddEdge(0, 5);
// Add "Default" template group to nodes.
foreach (var node in graph.GetNodes())
{
node.TemplateGroup = "Default";
}
Step 4: Run the Layout Generator
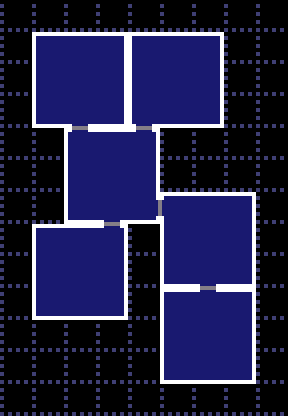
To create repeatable layouts, a random seed is used by the layout generator. To generate a room layout, simply select a seed and pass your layout graph and room template groups to the LayoutGenerator, as shown below. In the example, a map of the layout is also rendered and saved using the LayoutMap class. For this instance, the default built-in tiles are used. However, custom tiles can also be specified by the user.
{LayoutGenerator.cs}
var layoutId = 1;
var seed = new RandomSeed(12345);
var generator = new LayoutGenerator();
var layout = generator.Generate(layoutId, graph, templateGroups, seed);
// Render map and save it to file
var map = new LayoutMap();
map.SaveImage("Map.png", layout);
Collectable Generator Example
The collectable generator distributes collectables throughout a layout.
{CollectableGenerator.cs}
var seed = new RandomSeed(12345);
var generator = new CollectableGenerator();
// Add collectable ID's to groups. Multiple ID's may be added for the same item.
// These groups will also need to be assigned to some room template cells.
var collectableGroups = new CollectableGroups();
collectableGroups.Add("Group1", new int[] { 1, 1, 1, 2, 3, 4, 5 });
collectableGroups.Add("Group2", new int[] { 6, 7, 7, 8, 8, 9, 10 });
generator.Generate(layout, collectableGroups, seed);
Layout Graph Selector Example
The layout graph selector draws a random layout graph from a supplied list. This is useful when used as an early step in a Pipeline.
{LayoutGraphSelector.cs}
// Create a list of graphs from which to draw.
var graphs = new List<LayoutGraph>
{
new LayoutGraph(id: 1, name: "ExampleGraph1"),
new LayoutGraph(id: 2, name: "ExampleGraph2"),
new LayoutGraph(id: 3, name: "ExampleGraph3"),
};
var seed = new RandomSeed(12345);
var selector = new LayoutGraphSelector();
var graph = selector.DrawSelection(graphs, seed);
Layout Graph Randomizer Example
The layout graph randomizer generates variations of a layout graph based on user-defined swappable nodes.
{LayoutGraphRandomizer.cs}
var seed = new RandomSeed(12345);
var graph = new LayoutGraph(id: 1, name: "ExampleGraph");
// Add any nodes and edges to the graph.
// See the previous Layout Generator example.
// Add nodes to variation groups.
// The nodes in these groups will be shuffled and swapped by the randomizer.
graph.AddNodeVariation("Group1", new int[] { 1, 5, 3 });
graph.AddNodeVariation("Group2", new int[] { 0, 7, 10, 12 });
// Create a randomizer and create a new graph variation.
var randomizer = new LayoutGraphRandomizer();
var graphVariation = randomizer.RandomizeGraph(graph, seed);
Generation Pipeline Example
The generation pipeline provides a way for multiple generation steps to be chained together. This is often easier than making manual calls to each generation step.
{GeneratorPipeline.cs}
// Create a dictionary of inputs to be passed to each pipeline step.
var inputs = new Dictionary<string, object>
{
{ "LayoutId", 1 },
{ "LayoutGraph", graph },
{ "TemplateGroups", templateGroups },
{ "CollectableGroups", collectableGroups },
{ "RandomSeed", seed },
};
// Use the default pipeline
var pipeline = PipelineBuilder.CreateDefaultPipeline();
// Or create your own
pipeline = new Pipeline(new LayoutGenerator(), new CollectableGenerator());
var results = pipeline.Run(inputs);
var layout = results.GetOutput<Layout>("Layout");
